
How to export landing page leads and campaign results
QuickPages separates two different jobs: reviewing the people who submitted a form and reviewing aggregate campaign performance. The lead inbox contains individual submissions. Page, funnel, and A/B test reports show views, estimated visitors, submissions, and visitor conversion rate.
Export leads when you need names, email addresses, submitted fields, and source details. Export report statistics when you need performance totals by page, funnel step, or A/B test variant.
| Question | Use this view or export |
|---|---|
| Who submitted the form? | Filtered lead inbox or lead CSV |
| How did one page perform? | Page report and page statistics CSV |
| Where does a two-step flow lose visitors? | Funnel report |
| Which variant performed better? | A/B test report and statistics CSV |
| Which campaign source produced the lead? | Lead details, UTM filters, or lead CSV |
1. Start in the lead inbox
Open Leads from the sidebar to review all form submissions you own. Each lead is tied to its page and conversion, so QuickPages can show the submitted fields together with campaign context.
The inbox can include:
- Email address and any extra form fields.
- The page, dashboard, funnel, and A/B test associated with the submission.
- The captured date and the selected reporting range.
- Referrer and UTM source information when it was present on the visit.
2. Make the active filters visible
Filter by dashboard, page, or A/B test when you need one campaign. Search can narrow the list to an email address or a value inside the submitted fields. Date controls default to All time, so apply a shorter range deliberately when you are reviewing a launch or reporting period.
Links such as View leads on a page, funnel, or test report open the same inbox with that campaign filter displayed. You can adjust or clear it instead of working with a hidden filter.
3. Export individual leads
Use the lead inbox CSV export when the file must contain actual submissions. The current filters and date range define which rows are downloaded. This is the correct export for a client handoff, manual follow-up, spreadsheet review, or import into another system.
- Open the lead inbox from the campaign or sidebar.
- Confirm the dashboard, page, A/B test, search, and date filters.
- Review a few rows before exporting.
- Download the filtered lead CSV.
- Keep the date range with the file name or client report.
4. Read a page report
A page report answers whether one page is working. Start with total views, estimated visitors, submissions, and visitor conversion rate. Multiple legitimate submissions can come from one visitor, so submissions and estimated visitors answer different questions.
If the page has traffic but few conversions, inspect the offer, message match, form length, and mobile layout. If the page converts but the resulting leads are poor, tighten the promise or ask a better qualifying question.
5. Read a funnel as a sequence
A funnel report connects the opt-in and thank-you steps without merging their page-level history. Compare opt-in views and leads first, then thank-you views and the action you want visitors to take there.
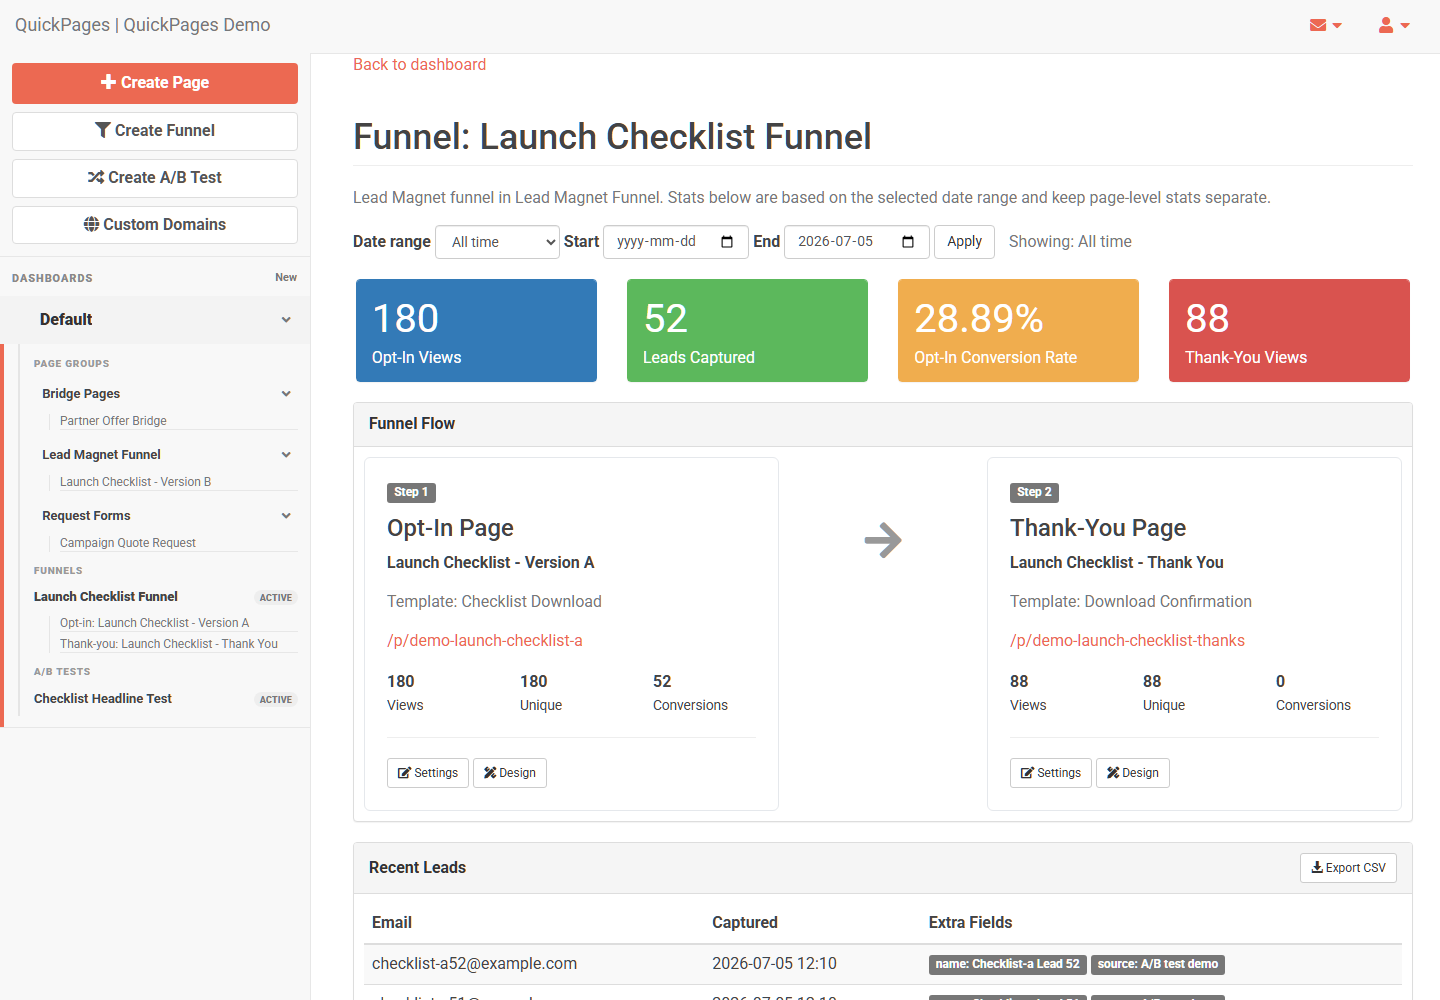
6. Separate A/B test totals from lead details
The A/B test report compares variant traffic, submissions, and visitor conversion rate. Its statistics CSV is designed for the experiment totals. To download the people who submitted, use View leads; the inbox opens with the A/B test filter visible and exports the matching individual submissions.
Do not choose a winner after a handful of visits. Confirm that both variants received meaningful traffic and that the winning conversion rate also produced useful leads.
7. Preserve the reporting context
A CSV without its filters can be misleading. Record the date range, campaign, and purpose of each export. For recurring reporting, use a consistent window and compare equivalent periods rather than mixing all-time results with a recent campaign.
8. Automate only when it helps
CSV is appropriate for validation, occasional client handoffs, and small campaigns. When every new lead needs immediate routing, tagging, or follow-up, connect the conversion webhook to an automation service. QuickPages still stores the lead locally before queuing the external delivery.
The Zapier webhook guide shows the full setup and test process.
For consistent campaign labels inside those files, use the UTM attribution guide.
Fast diagnosis
- Few views: the traffic or distribution problem comes before page optimization.
- Views but few leads: improve the offer, message match, trust, or form.
- Leads but weak next steps: improve the thank-you page and follow-up.
- Good volume but poor quality: clarify the audience or add a useful qualifying field.